In this guide, Andrew Jardine and Abhishek Thakur will demonstrate how you can easily create your own open-source ChatGPT without any coding expertise! Using the LLaMA 2 base model, they’ll refine it for chat interactions using an open-source dataset and then integrate it into a chat application for you to share. The best part? It’s all achievable through a few simple clicks.
So, why does this matter? The domain of machine learning, particularly Large Language Models (LLMs), has seen a phenomenal rise, becoming an indispensable asset in both our personal and professional spheres. However, for many who aren’t immersed in the world of ML engineering, the complexities of training and deploying such models can seem daunting. As we envision a future dominated by widely available customized machine learning models, a pressing question emerges: How can we enable individuals without a tech background to leverage this innovation on their own?
At Hugging Face, we’ve been diligently laying the groundwork for this inclusive era. Our array of resources, such as Spaces, AutoTrain, and Inference Endpoints, aims to make the realm of machine learning approachable for all.
To illustrate the simplicity of this vision, this guide will walk you through the utilization of Spaces, AutoTrain, and ChatUI to craft your chat application—all without typing a single line of code. For clarity, I’m not an ML engineer myself but a proud member of the Hugging Face GTM crew. If I can achieve this, so can you! Let’s get started!
Introduction
Introduction to Spaces
Spaces by Hugging Face offers a user-friendly interface to design and launch web-based ML demonstrations and applications. With this service, you have the flexibility to swiftly set up ML demos using Gradio or Streamlit interfaces, upload custom apps within a Docker container, or even choose from a variety of ready-to-deploy ML applications.
In our journey, we’ll be deploying two pre-set Docker app templates from Spaces: AutoTrain and ChatUI.
Dive deeper into Spaces here.
Introduction to AutoTrain
Meet AutoTrain: a code-free solution enabling those without an ML engineering background (heck, even non-developers! 😮) to train cutting-edge ML models. Whether it’s for natural language processing, image recognition, voice recognition, data analysis, or even fine-tuning LLMs as we’ll cover today, AutoTrain has got you covered.
Discover more about AutoTrain here.
Introduction to ChatUI
ChatUI is precisely as it’s named—an open-source user interface crafted by Hugging Face to facilitate interactions with open-source LLMs. Worth noting, it’s the driving force behind HuggingChat, our fully open-source counterpart to ChatGPT.
Delve into the details of ChatUI here.
Step 1: Initiating a New AutoTrain Space
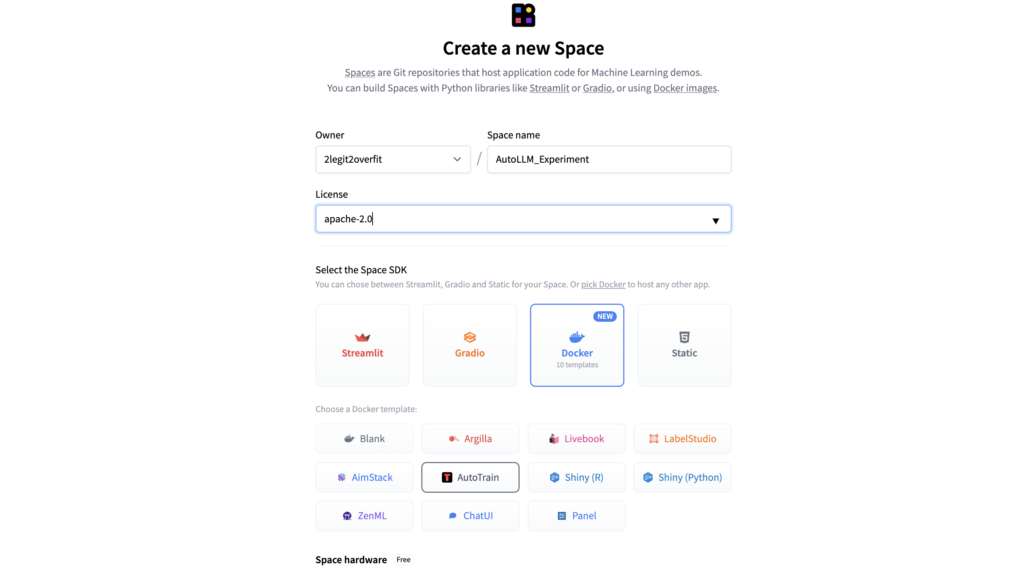
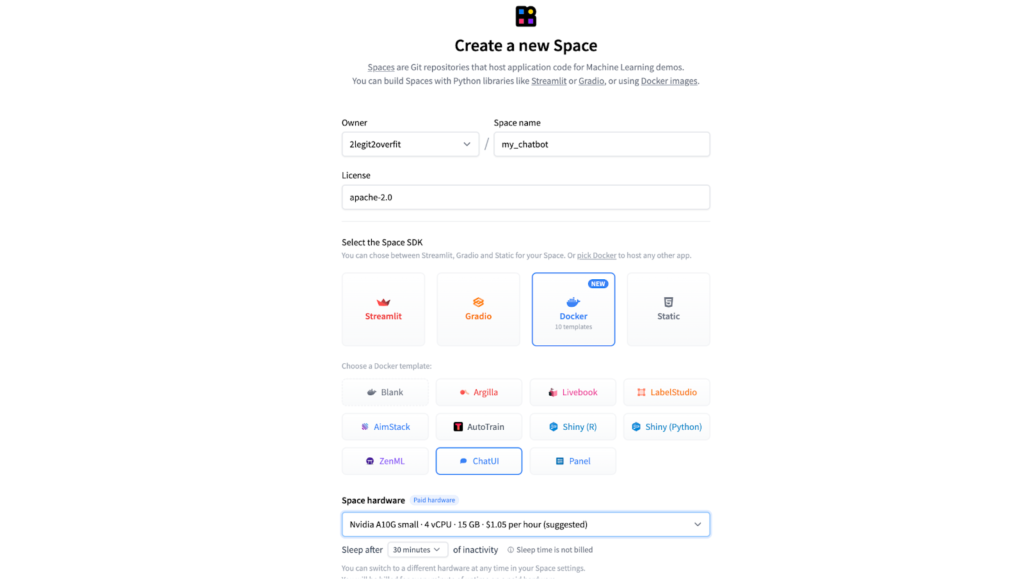
1.1. Begin by navigating to huggingface.co/spaces and opt for “Create new Space”.

1.2. Assign a unique name to your Space. If you intend to share your model or Space publicly, choose an appropriate usage license.
1.3. To launch the AutoTrain app using the Docker Template within your designated space, navigate to Docker and then select AutoTrain.
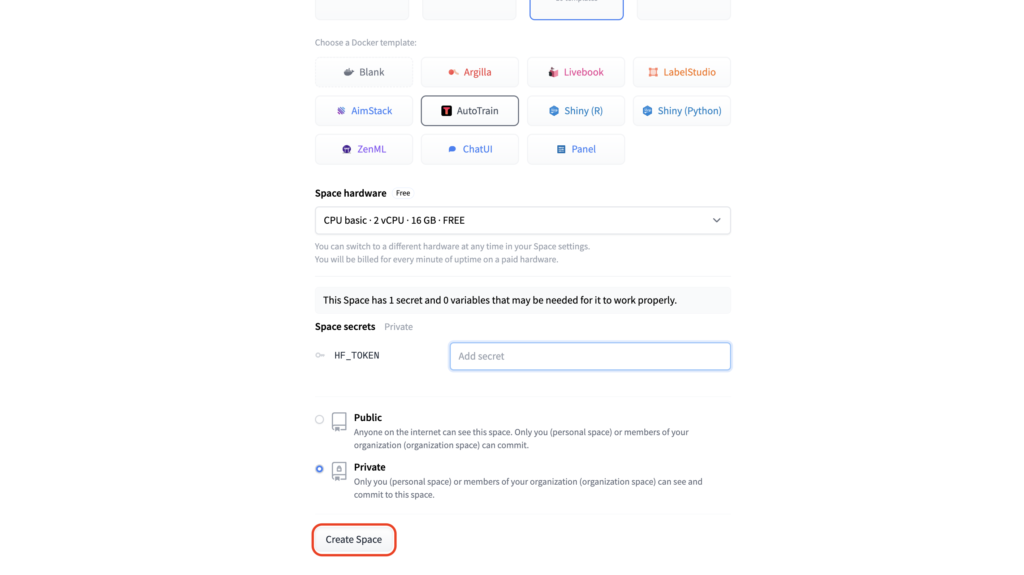
1.4. Choose the hardware configuration for your Space, referred to as “Space hardware”. (Keep in mind: For the AutoTrain application, the complimentary “CPU basic” option will be adequate. The computation for model training will be handled separately, which we’ll decide upon later.)
1.5. Input your “HF_TOKEN” under the “Space secrets” section. This step is crucial as it grants the Space access to your Hub account. Absent this, the Space won’t possess the capability to train or save a new model within your account. (Heads up: Your HF_TOKEN can be located within your Hugging Face Profile, under the tab Settings > Access Tokens. Ensure that the token’s access level is set to “Write”.)
1.6. Determine the visibility of your Space. Decide if you want it to be “Private” or “Public”. It’s advisable to set the AutoTrain Space to Private initially. Nevertheless, you have the freedom to share your model or Chat App with the public later.
1.7. Click on “Create Space”. Voilà! Your fresh Space will require a few moments to set up. Once ready, you can access the Space and begin your journey with AutoTrain.
Step 2: Initiate Model Training with AutoTrain
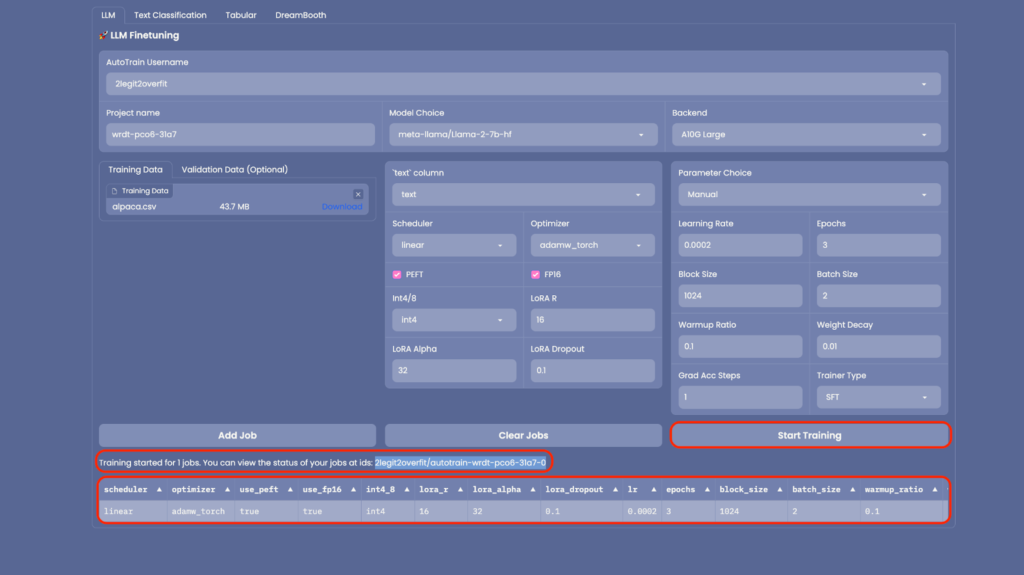
2.1. After your AutoTrain Space is up and running, you will be greeted with the interface depicted below. AutoTrain offers diverse training capabilities, from LLM fine-tuning to text classification, diffusion models, and tabular data handling. For our current objective, which is LLM training, click on the “LLM” tab.
2.2. From the “Model Choice” dropdown, select the LLM you wish to train. You can either pick from the provided list or input the name of a model mentioned in a Hugging Face model card. For this tutorial, we’re employing Meta’s Llama 2 7b foundation model. Delve deeper into its specifications here. (Remember: Llama 2 is a restricted model, necessitating permission from Meta for utilization. However, there’s a plethora of unrestricted models available, such as Falcon.)
2.3. Under the “Backend” section, designate the type of CPU or GPU for your training. For a model like the 7b version, an “A10G Large” should suffice. If you’re venturing into training a more substantial model, ensure that it can comfortably reside within the memory of your chosen GPU. (Note: For training colossal models that require an A100 GPU, get in touch at api-enterprise@huggingface.co)
2.4. Naturally, to fine-tune a model, you’ll require “Training Data”. Upon uploading, ascertain that the dataset adheres to the right format and is in the form of a CSV file. You can familiarize yourself with the requisite format here. If your dataset encompasses multiple columns, don’t forget to pinpoint the “Text Column” containing the training data. For our tutorial, we’re harnessing the power of the Alpaca instruction tuning dataset. Gather more insights about this dataset here.

2.5. Optional: AutoTrain provides the facility to upload “Validation Data” to evaluate the performance of your freshly trained model. However, this step isn’t mandatory.
2.6. AutoTrain boasts a suite of advanced configurations that can be tailored to minimize the memory consumption of your model. Options include adjusting precision (through “FP16”), opting for quantization (“Int4/8”), or activating PEFT (Parameter Efficient Fine Tuning). It’s advisable to retain the default settings, as they help in curtailing the training duration and associated costs, while only marginally affecting the model’s efficacy.
2.7. You also have the freedom to modify the training parameters under “Parameter Choice”. However, for this walkthrough, we’ll stick with the default configurations.
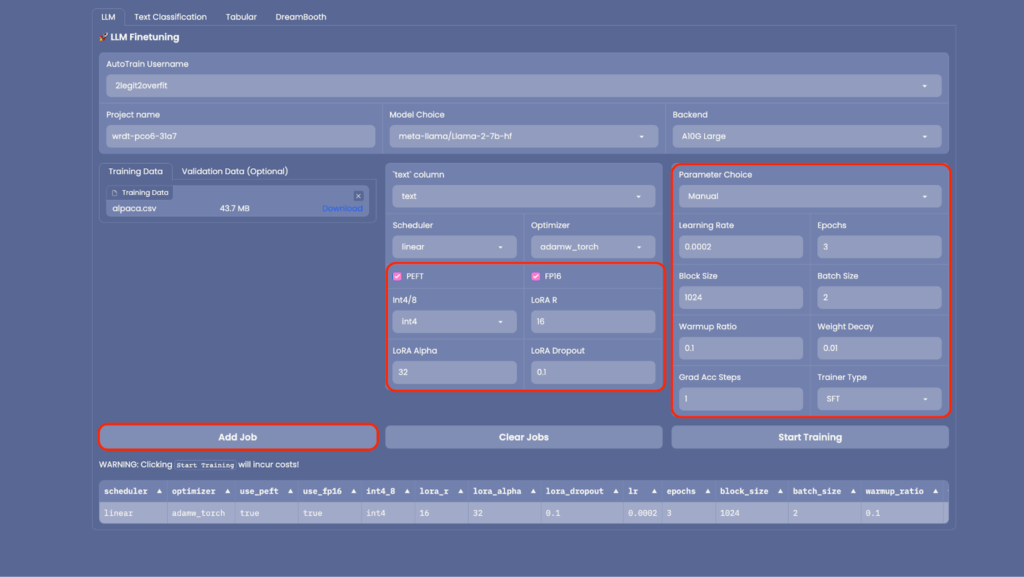
2.8. With everything primed, click on “Add Job” to usher the model into your training queue. Subsequently, hit “Start Training”. (Remember: If your aim is to train several model versions with varied hyper-parameters, you have the option to queue multiple jobs for concurrent execution.)
2.9. As the training commences, you’ll observe the genesis of a new “Space” within your Hub account. This Space is the operational hub for your model’s training. Upon culmination, the newly minted model will be showcased in your Hub account, listed under “Models”. (Hint: To monitor the training’s real-time progress, you can peruse the live logs available in the Space.)
2.10. It’s break time! Depending on your model’s magnitude and the volume of training data, this phase could span from a few hours to several days. Upon completion, your spanking new model will be spotlighted in your Hugging Face Hub, nested under “Models”.
Step 3: Establish a New ChatUI Space with Your Model
3.1. To set up a new Space for ChatUI, replicate the procedure outlined in steps 1.1 through 1.3. However, this time, choose the ChatUI docker template in lieu of AutoTrain.
3.2. Decide on the hardware configuration for your Space. For our 7b model, an “A10G Small” should be adequate. Nonetheless, the appropriate configuration might differ based on your model’s size.
3.3. If you possess your own Mongo DB, input its details in the “MONGODB_URL” section to store chat logs. If you don’t provide these details or leave the field empty, a local database will be automatically created for you.
3.4. To operate the chat app using the model you’ve cultivated, specify the “MODEL_NAME” in the “Space variables” segment. The name of your model can be identified in the “Models” tab of your Hugging Face profile. It will match the “Project name” you utilized in AutoTrain. In our scenario, it’s denoted as “2legit2overfit/wrdt-pco6-31a7-0”.
3.5. Then, within the “Space variables” realm, you also have the option to modify model inference parameters. This includes variables like temperature, top-p, maximum tokens generated, and more, which influence the characteristics of your generated content. For the purpose of this tutorial, we’ll adhere to the pre-set configurations.
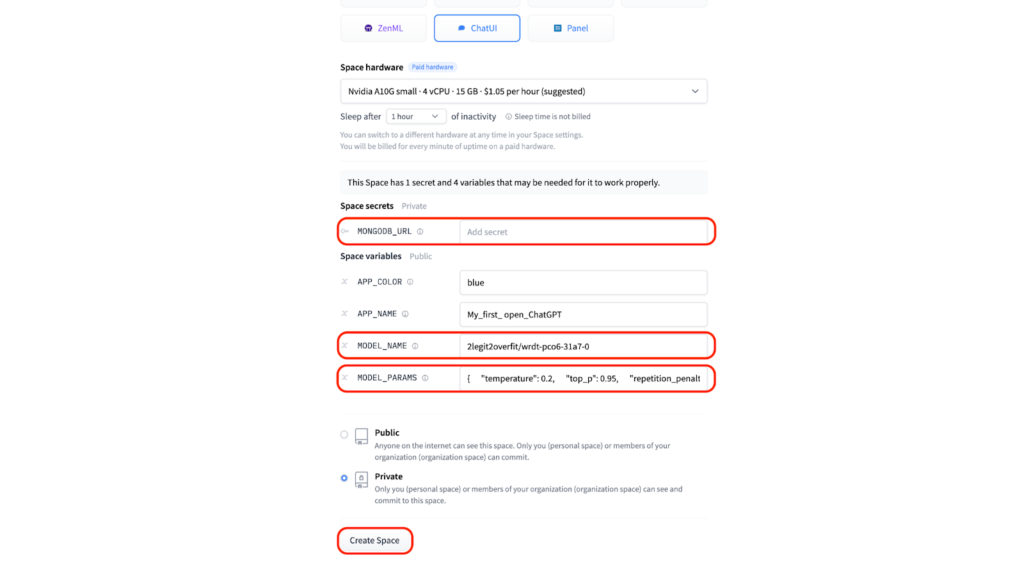
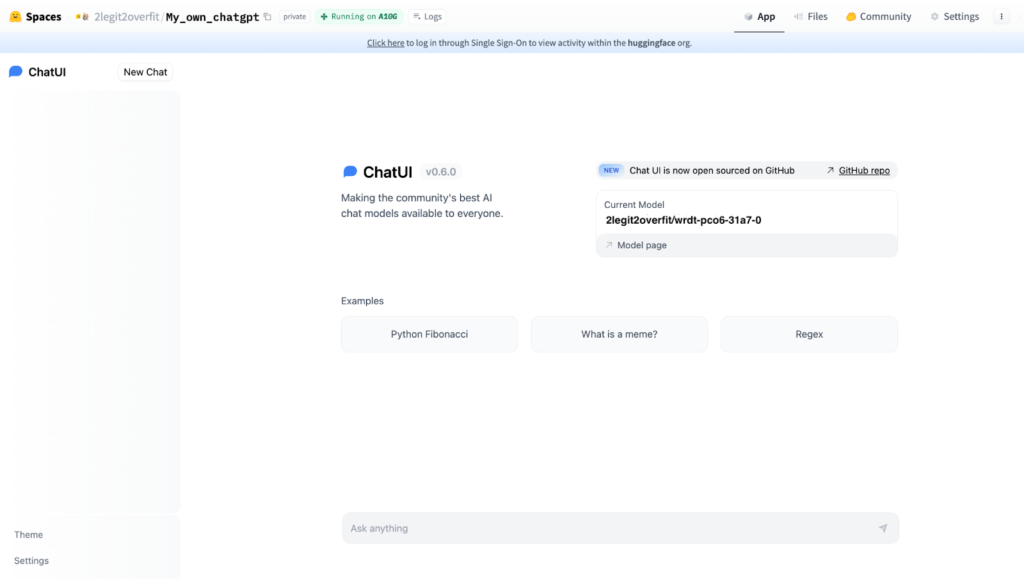
3.5. With everything in place, click on “Create” to unveil your personalized open-source ChatGPT. Kudos on your achievement! If all steps were executed correctly, the outcome should resemble the given illustration.
Feeling the spark of inspiration but require a bit of technical guidance to kick things off? Don’t hesitate to get in touch and apply for support here. Hugging Face provides a premium “Expert Advice” service that might be just what you need to embark on your journey.